 Happy rainbow cookie will make you WORK
Rainbow cookies nearly defeated me. To make them requires almost 1 lb almond paste, 6 eggs, 2 lb of butter, lots of steps to make the batter, 3 rectangle pans to bake, many steps to assemble, and so much patience. Multiple steps means multiple ways to screw up, and once you've messed up a few steps you're going down a creek without a paddle. You can see the struggle in the photos, but I did not give up.
The cookies tasted fine, but not perfect. I found the
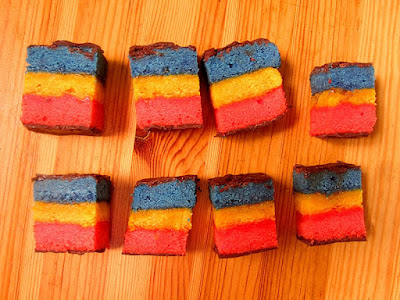
recipe in the May 2o11 issue of Bon Appétit. You may also notice my cookies are yellow, red, and blue rather than the Italian reg, white, and green. I made the cookies to match my composting diagram for Prospect Farm. I brought the cookies to Compost for Brooklyn's Block Party to highlight the layers of trench compost. Each cookie acted as a mini
trench compost diagram. A cute idea that some appreciated, and had some asking is this made of dirt?
Rainbow Cookies2
tblsp plus 2 cups unsalted butter, at room temp
6 large egg white
6 large egg yolks
1 1/3 cups sugar, divided
12 oz almond paste (not marzipan), chopped
2 3/4 cups plus 1
tblsp flour
1 tsp salt
1 tsp red food coloring
1/2 tsp yellow food coloring
1 tsp blue food coloring
3/4 cup orange marmalade
4 oz bittersweet chocolate
Whip 6 egg whites until soft peaks form. Add 1/3 cup sugar and continue to beat until firm peaks form. Chill. Meanwhile line three 9 x 13 inch rectangular baking pans with foil, allowing foil to overhang length-wise. Grease foil and sides of the pans with 2 tablespoons of butter.
Add 1 cup of almond paste and sugar to a mixer and beat at medium speed for 5 minutes. Increase speed to medium high and slowly add 2 cups of butter. Beat until fluffy. Add in yolks, one at a time until combine. Add salt and flour, being careful not to over mix. Fold egg whites in two additions by hand with a spatula. Lots of work, eh? Take a breather.
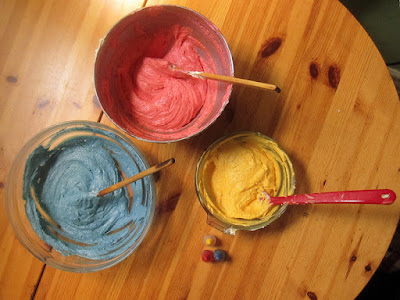 Uggh, I hate artificial colors, but it's a tradition.
You can use green in place of blue to, so Italian.
Preheat oven to 350. Divide batter into 3 bowls. Add 1 color of food coloring to each bowl, and fold until evenly colored. Now you're ready to bake. Transfer each colored batter into one prepared pan. Spread evenly, and place in oven. Bake for 9-12 minutes. Rotate pans half way. Remove cakes from the oven when batter is just set.
 Yellow layer will go up, over, and on top of the marmalade covered red layer
Meanwhile melt marmalade. The recipe suggests you strain the peel parts out, but I think it's fine to leave it in. Brush half of the marmalade on top of the red layer. Lift the yellow layer up using the overhanging foil. Flip top-side-down over the red layer. Peel foil back. Brush the top of the yellow layer with remaining marmalade. Lift the blue layer up using the overhanging foil. Flip top-side-down over the yellow layer. Do not peel the top layer of foil. Place a cookie sheet on top of blue layer. Carefully flip all layers on to the cookie sheet. Place another cookie sheet over the red layer. Weight down with cans, and chill for 4 hours or up to one day. Congratulate yourself on completing the hardest part of making rainbow cookies. You are out of the woods.
 Ready to chill? The layers are.
Melt the 4 oz of chocolate over in a double boiler (or a heat proof bowl such as stainless steel or tempered glass, over boiling water) or in a microwave. Whichever you prefer. Remove cake layers from fridge, and peel back top layer of foil. Brush half the chocolate over the red layer.
 Take your time, and the results will line up neater then mine. Less trimming equals less waste.
Place uncovered in freezer for 15 minutes to harden the chocolate. Remove from freezer. Place wax paper on top of chocolate layer. Replace cookie sheet over waxed paper, and carefully flip so blue layer is now up. Peel back foil on the blue layer. Brush remaining chocolate over blue layer. Freezer, uncovered for another 15 minutes until hardened. Cut the cookie into 1/2 - 3/4 inch slices. Serve! Finally! I kept mine in an airtight freezer container until they were ready to be served.
 Happy rainbow cookie will make you WORK


I really enjoyed your post and the cookies look great! I made these myself last year for Easter (here is a link to check them out: http://opendoornumberfour.blogspot.com/2010/04/making-seven-layer-cookies.html) and even though they tasted delicious (I used the smittenkitchen instructions), they were extremely difficult to make and I also almost gave up. You're not alone :)
ReplyDeleteCool. Thanks Crystal, we have earned some real kitchen cred having completed these totally cookies.
ReplyDeleteThese look really good. I may give these a go sometime when I have some help in the kitchen.
ReplyDelete